

The short answer: do you have a spare M.2 SSD left over after a laptop upgrade? With an M.2 enclosure, you turn it into a fast external drive in just a few minutes. Click the drive in, connect the USB-C cable, format it, and you have a portable drive that feels brand new. No drivers, no hassle.
Below, we walk you through it step by step: which enclosure fits, how to place the SSD, and how to get it ready for use on Windows, Mac or Linux.
What you need
Surprisingly little, actually. You only need your loose M.2 SSD and a matching enclosure. Everything else usually comes included.
- Your M.2 SSD (NVMe or SATA, we'll check that in a moment)
- A matching M.2 enclosure
- The USB-C cable and the tiny screw (included with the enclosure)
The Switss® M.2 SSD enclosure with heatsink works with both NVMe and SATA drives up to 2 TB and reaches speeds up to around 1050 MB/s via USB 3.2 Gen 2. Fast enough to move an entire photo library or video project in seconds. The heatsink keeps the SSD cool, so the speed stays steady even with large files.
Do you have a USB4 or Thunderbolt 4 port on your laptop and want to get the most out of a fast NVMe drive? Then the Switss USB4 / Thunderbolt 4 enclosure takes you to speeds up to 3000 MB/s via 40 Gbps, and fits SSDs up to 8 TB. Roughly three times as fast.
Step 1. Check your SSD: type and length
Two things determine whether an enclosure fits. First, the length. M.2 drives come in 2242, 2260 and 2280 mm; the last format is by far the most common and is supported by most enclosures. The number is often printed on the SSD itself or listed in your laptop's specs.
Second, the type: NVMe or SATA. Internally, that makes a huge difference in speed, but as an external drive there is an important nuance.
| Type | Internal speed | Via USB 3.2 Gen 2 | Via USB4 |
|---|---|---|---|
| NVMe | 3000–7000 MB/s | ~1050 MB/s | ~3000 MB/s |
| SATA M.2 | 500–550 MB/s | ~500 MB/s | ~500 MB/s |
The key point: with an external drive, the USB connection determines the maximum speed, not the SSD. A blazing-fast NVMe drive only delivers a real advantage outside your PC if you also have a USB4 or Thunderbolt port.
Step 2. Fit the SSD into the enclosure
This is the fun part, and it only takes a minute. No tools needed except the included screw.
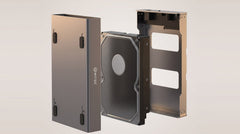
- Open the enclosure (slide off the cover or loosen the screw).
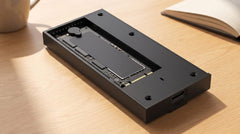
- Hold the SSD at a slight angle of about 30 degrees and slide the gold contacts into the M.2 slot. It only fits one way, so never force it.
- Press the SSD flat and secure it with the tiny screw.
- Click the enclosure shut. Done.
No drivers are needed. The enclosure is plug-and-play on Windows, macOS and Linux: connect it and it's recognized.
Step 3. Connect and format
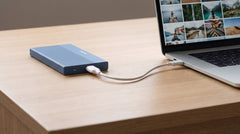
Connect the enclosure with the included USB-C cable. Is your SSD new or just wiped? Then you need to format it once before you can store files on it.
On Windows
- Press Windows + X and open Disk Management.
- Windows will ask if you want to initialize the new drive. Choose GPT.
- Right-click the unallocated space → New Simple Volume.
- Choose NTFS (or exFAT if you also want to use the drive on a Mac), assign a drive letter and finish.
On macOS
- Open Disk Utility (via Spotlight or Applications → Utilities).
- Select the new drive in the left sidebar.
- Click Erase and choose APFS (Mac only) or exFAT (also readable on Windows).
- Confirm with Erase.
On Linux
Locate the drive with lsblk (usually /dev/sdb or /dev/nvme1) and format it with mkfs.ext4 for Linux or mkfs.exfat for cross-platform use.
Which file system should you choose?
The short version: only using the drive on Windows? Choose NTFS. Switching between Windows and Mac? Choose exFAT. Working purely on Mac? Then APFS is the fastest.
| File system | Suitable for | Max. file size |
|---|---|---|
| exFAT | Windows + Mac + Linux | 16 EB |
| NTFS | Windows (primary) | 16 TB |
| APFS | macOS (primary) | 8 EB |
| ext4 | Linux (primary) | 16 TB |
Not sure? exFAT is the safest all-rounder: it works on almost everything. NTFS also works on Mac, but you sometimes need an extra program there to be able to write to it.
What speed can you expect?
That depends entirely on the USB port on your computer. A fast enclosure on a slow port stays slow, so check first what your laptop offers.
| Connection | Max. read speed |
|---|---|
| USB 2.0 | ~40 MB/s |
| USB 3.0 / 3.1 Gen 1 | ~400–500 MB/s |
| USB 3.2 Gen 2 | ~1050 MB/s |
| USB4 / Thunderbolt 4 | ~3000 MB/s |
Does your laptop only have USB 3.0? Then the port is the bottleneck and you won't notice any difference between a Gen 2 and a USB4 enclosure. For most people, the USB 3.2 Gen 2 enclosure is therefore exactly right.
Conclusion
Turning a loose M.2 SSD into an external drive really is as simple as it sounds: get an enclosure, insert the drive, format it, done. In under ten minutes you have a fast portable drive that gives your old SSD a second life. And the speed you get depends mostly on your USB port.
For the vast majority of laptop upgrades, the Switss M.2 SSD enclosure with heatsink is the best choice: suitable for both NVMe and SATA, up to 1050 MB/s and SSDs up to 2 TB. Do you have a USB4 or Thunderbolt 4 port and want to get the most out of it? Then go for the Switss USB4 / Thunderbolt 4 enclosure, with speeds up to 3000 MB/s and room for up to 8 TB. Still unsure which one to choose? Our Dutch customer service is happy to help, with a 2-year warranty and 30-day returns.
Frequently asked questions
Can I reuse a used M.2 SSD from my old laptop?
Yes, that's actually the ideal use case. As long as the drive is physically in good condition, it works fine in an enclosure. Was there still data on it? Then format it clean first.
Do I need to install drivers or software?
No. A good M.2 enclosure is plug-and-play and works right away on Windows 10/11, macOS 11 and later, and recent Linux versions.
How do I know if my SSD fits?
Check two things: the length (usually 2280 mm, the standard format) and the type (NVMe or SATA). The Switss enclosure supports both types. The 22110 format (110 mm) usually doesn't fit in compact enclosures.
My drive doesn't show up after connecting it. What now?
Check that the SSD clicks properly into the slot and that the USB cable is fully plugged in. A new drive also needs to be formatted once first: open Disk Management (Windows) or Disk Utility (Mac) and you'll find it there.
Can I boot from the external SSD (boot drive)?
Sometimes, but that depends on your computer's BIOS/UEFI and the USB port. Not every system supports booting via USB, so don't rely on it.